31 October 2022
Why you need to know about the Battle of Beersheba
The Battle of Beersheba marked a key moment in First World War’s Middle Eastern theatre but how well do you know it? Find out more about this key battle on its 105th anniversary.
The Battle of Beersheba

Image: The Charge of the Australian Light Horse at Beersheba, 1917, George Washington Lambert, 1920 (Wikimedia Commons)
CWGC historian Dr. George Hay guides us through this historic battle, and its importance, in Silent Cities. Take a look to learn more about the battle.
The Great War in the Middle East
When we think of the Great War, the collective view immediately conjures images of the Western Front: Flanders Field; Mud, blood, and wire; No Man’s Land; machine guns; trench warfare.
But World War One, as its name suggests, was a truly global conflict. Battles were fought in Europe, Asia, Africa, and the Middle East.
In terms of the Middle East, the two main events that steal the Great War headlines are of course Gallipoli and the exploits of T.E Lawrence.
But the war in the region, incorporating battlefields in Turkey, Syria, Palestine, and today’s Iraq, Israel, and Jordan, lasted as long as the war on the Western Front. Many campaigns took place between 1914-1918 there.
British Imperial forces fighting throughout Mesopotamia and the Middle East represented many nations. Indian, Egyptian, ANZAC, and British troops fought in campaigns throughout the region.
What were the goals of the Middle East campaign?
For the Entente powers (Britain, France and Russia), it was a chance to knock the belligerent Ottoman Empire out of the war and potentially break it up altogether.
Britain’s individual goals were threefold:
- Maintain naval superiority in the Mediterranean
- Maintain the balance of power in Europe
- Protect its territories in Egypt, the Middle East, India, and the Persian Gulf
The Ottoman Empire, which had controlled the Middle East for hundreds of years, likewise recognised an opportunity to strengthen its waning grip on power throughout the region.
Then there was the Suez Canal. The canal was a vital lifeline in terms of shipping men and material from Asia and the Far East to the Western Front. The British and French wished to keep the Suez Canal open.
If the Ottomans could wrest the canal under their control, the consequences for the Entente could have been devastating.

Image: The Imperial Camel Corps Brigade marching into Beersheba, 17th November 1917 (© IWM Q 13157)
War breaks out in the Middle East
War was declared by the pro-German Ottoman Empire on the Allies in October 1914. An extensive period of battles and manoeuvring followed, with the British and Ottomans vying to gain the initiative.
In response to Ottoman mobilisation, the British declared Egypt a protectorate and moved Indian army troops to other key Middle East locations, such as Basra in present-day Iraq.
Ottoman troops attacked the Suez Canal in 1915 but were repulsed by British and Egyptian soldiers. Following the failed attack at Suez, the British bolstered their forces with reinforcements from India, Australia, and New Zealand.
If you’re familiar with the Dardanelles Campaign, you’ll know what comes next: Gallipoli. The Winston Churchill-led initiative to open a second front in the Middle East to relieve pressure on the Western Front would end in failure.
British Imperial forces, famously including ANZACs, and reinforced by French allies, failed to make any significant breakthroughs at Gallipoli on the Turkish coast. Ottoman troops were well dug in and after months of fighting, and hundreds of thousands of casualties on both sides, the Allies admitted defeat.
The Gallipoli campaign lasted from 25th April 1915 to 9th January 1916.
Despite this setback, the formation of the Egyptian Expeditionary Force (EEF) in March 1916 gave the British more flexibility and impetus to fight in other important locations throughout the region.
The EEF would begin to offset setbacks in Mesopotamia and other Middle Eastern theatres by beginning a concerted push up the Sinai Peninsula toward Palestine.
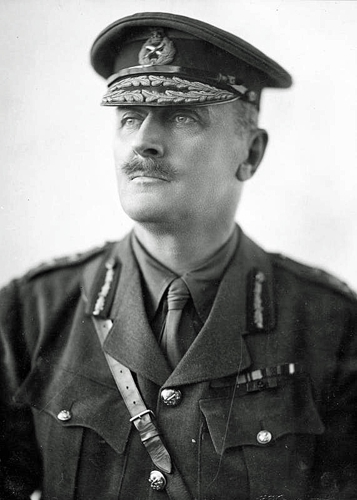 Image: General Edmund Allenby (Wikimedia Commons)
The men of the Egyptian Camel Transport Corps were instrumental in the advance up the Sinai.
Searing heat, whirling desert tempests, and harsh conditions meant soldiers required constant supplies of water, food, and shelter. With their hardy mounts carrying vital supplies, the Egyptian Camel Transport Corps provided much-needed logistical support to the EEF advance.
Despite initial successes throughout 1916 and a strong advance into Palestine, aided by the concurrent events of the Arab Revolt instigated by T.E Lawrence and his Arabian allies, the situation in the Middle East reached a stalemate by April 1917.
The EEF under General Archibald Murray had run into fierce Ottoman resistance at Gaza, Southern Palestine. Troops dug in, but Murray was replaced as the British high command sought to inject new energy into the Middle East campaign.
The appointment of General Edmund Allenby led to a retooling and reorganisation of the EEF. He spent the next months building up a numeric and logistical advantage over his Ottoman opponents.
The groundwork for the Battle of Beersheba had been laid.
The Battle of Beersheba begins
Why was Beersheba a target for British forces?
 Image: Beersheba in 1917 (Wikimedia Commons)
Today, Beersheba is a city of some 200,000 people. It’s a sleek, modern metropolis, featuring all amenities of 21st-century life. At the time of the Battle of Beersheba, it was substantially smaller, with just 1,000 or so residents.
The Ottoman government had been gradually expanding Beersheba as its central hub for the native Bedouin population.
The town had been a transport node for camel sellers and traders for centuries. The only metalled road in the region stretched northeast out of the town and it was connected to other areas in Gaza by railway.
It also lay in a strategic location.
Gaza was proving an immovable object for the EEF. Two sieges of the seaside city had failed.
Beersheba, some 40 miles southeast of Gaza, was seen as the ideal place to launch an outflanking manoeuvre, capture a regional transport hub to support logistics, and eventually facilitate a march on Jerusalem to the north.
Who fought at the Battle of Beersheba?
British forces at the Battle of Beersheba included XX Corps of the EEF, composed of Welsh, Irish, and English regiments, including the 10th (Irish).
They were supported by the Imperial Camel Brigade and ANZAC cavalry units, such as the Australian Mounted Divisions, and the British 7th Mounted Brigade. This was in addition to Egyptian supporting troops in the logistics train.
All told, the British forces assembled to take Beersheba numbered around 47,500 infantry and 15,000 cavalries. Opposing them were around 4,000 Ottoman troops with 60 machine guns and 27 field guns.

Image: The Camel Corps: A Night March to Beersheba, James McBey, 1917 (© IWM Art.IWM ART 2926)
The attack is launched
At 05.55 on October 31st, 1917, the EEF began an ear-shattering bombardment of Beersheba. It would last for over two hours, raining havoc down on fortified Ottoman positions and trenches.
During the initial artillery strikes, wire cutters went forward to clear a path for the infantry.
The deadly ballet of battery and counter-battery fire lasted until 8.20.
Preliminary attacks took place after the big guns stopped their barrage, led by the 181st Bridge, 60th (London) Division. The 181st captured their main objective, a piece of high ground called Hill 1070 which overlooked Beersheba, allowing other regiments and artillery pieces to move up.
By 10.20, the 231st Brigade was just 460m from the Ottoman frontline.
EEF guns began another bombardment at 10.30 before XX Corps began its attack in earnest around midday.
The infantry began a full-on assault of Ottoman trenches to the west of the town. Their goal was to tie up Ottoman infantry while the cavalrymen of the Desert Mounted Corps moved in to capture Beersheba.
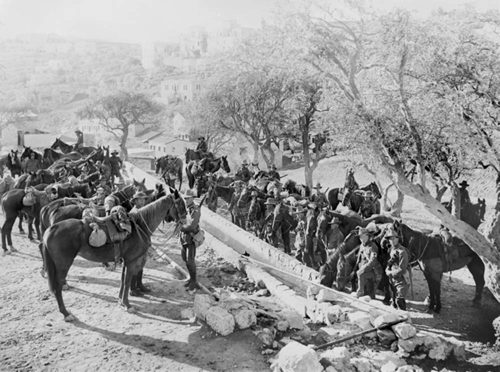 Image: An ANZAC mounted division getting ready for battle (Wikimedia Commons)
The Desert Mounted Corps incorporated the ANZAC cavalry units. These mounted formations had wheeled around Beersheba during the pre-battle phase, leading to an encirclement of the town.
While the infantry launched its assault to the west, the Desert Mounted Corps and its ANZAC horsemen captured several key roads and objectives in the east.
By the evening, the defenders’ position was becoming untenable.
Even so, there were concerns that the horsemen would be vulnerable to machine gun fire. On the Western Front, cavalry units had been decimated by fixed machine gun positions early in the war and had been essentially phased out as frontline troops.
This was not the case at Beersheba.
The 4th and 12th Australian Light Horse Division smashed through Ottoman lines and into the town. The speed of their advance took Ottoman machine gunners by surprise. Terrified Ottoman foot soldiers gave up their permission, rather than be trampled by the flailing hooves of the advancing war horses.
Australian casualties were very light, given the precedent set by the Western Front. Together, the 4th and 12th suffered just 31 killed and 36 wounded.
By 18.00 it was all over. With their charge, the Australians had taken Beersheba.
Casualties of Beersheba
If you’re picturing a massed infantry attack supported by cavalry against a defended emplacement, you may be thinking the British Imperial forces would have suffered huge casualty numbers. This is the classic view of Great War combat: static, action, slaughter.
This is not the case at Beersheba. Casualties were relatively light. The EEF suffered 171 killed during the whole engagement. When set against, say, Vimy Ridge, where the Canadians suffered 3,598 dead, the Battle of Beersheba was not as deadly as your “typical” World War One battle.
Ottoman forces sustained around 1,000 killed or wounded. Nearly 2,000 men were taken prisoner by the EEF.
At least 3 Victoria Crosses were awarded for gallantry during the Battle of Beersheba. 2 of those were posthumous. Here are the stories of those who fell but their actions awarded them this huge honour.
Major Alexander Malins Lafone
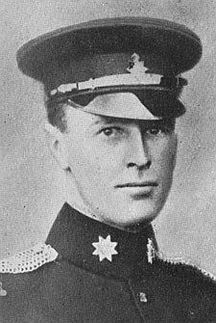 Image: Major Alexander Malins Lafone (Wikimedia Commons)
Major Lafone served with the Middlesex Hussars. He was 47 years old when killed during the fighting around Beersheba. For his actions on the battlefield, he was awarded the UK’s highest military honour.
Major Lafone’s Victoria Cross citation, as published in the 14th December 1917 edition of the London Gazette, reads:
“For most conspicuous bravery, leadership, and self-sacrifice when holding a position for over seven hours against vastly superior enemy forces. All this time the enemy were shelling his position heavily, making it very difficult to see. In one attack, when the enemy cavalry charged his flank, he drove them back with heavy losses.
In another charge they left fifteen casualties within twenty yards of his trench, one man, who reached the trench, being bayonetted by Major Lafone himself. When all his men, with the exception of three, had been hit and the trench which he was holding was so full of wounded that it was difficult to move and fire, he ordered those who could walk to move to a trench slightly in the rear, and from his own position maintained a most heroic resistance.
When finally surrounded and charged by the enemy, he stepped into the open and continued to fight until he was mortally wounded and fell unconscious. His cheerfulness and courage were a splendid inspiration to his men, and by his leadership and devotion he was enabled to maintain his position, which he had been ordered to hold at all costs.”
Captain John Fox Russell
 Image: Captain John Fox Russell (Wikimedia Commons)
The self-sacrifice of Royal Army Medical Corps personnel often wins them high honours. In the case of Captain John Fox Russell of the Royal Welsh Fusiliers, it won him the highest at the cost of his life.
Captain Russell had already performed with distinction at the First Battle of Gaza prior to the events of Beersheba, earning the Military Cross. He was known for his commitment to his men’s well-being and would throw himself in harm’s way to rescue wounded soldiers.
Captain Russell’s disregard for his own safety in the pursuit of others’ would result in his death. His VC citation from the London Gazette 8th January 1918 reads:
“For most conspicuous bravery displayed in action until he was killed. Captain Russell repeatedly went out to attend the wounded under murderous fire from snipers and machine-guns, and in many cases, when no other means were at hand, carried them in himself, although almost exhausted. He showed the greatest possible degree of valour.”
Captain Russell survived the Battle of Beersheba but would later fall during the British push into Palestine.
Commemorating the fallen of the Battle of Beersheba
The men who fell during the assault on Beersheba are commemorated at Beersheba War Cemetery.
The cemetery was created immediately after the town was taken. While casualties had been comparatively light, the fallen still required proper burial places.
The initial incarnation of the cemetery was used up to July 1918 and featured 139 burials.

Image: The headstones at Beersheba War Cemetery.
Beersheba War Cemetery was greatly expanded following the 1918 Armistice. Casualties from eight cemeteries within the district were moved to Beersheba. Now, the cemetery contains over 1,200 Commonwealth Burials of World War One.

Image: The Jerusalem Memorial dedicated to those who fell fighting in the Middle East with no known grave.
Those who fell fighting in the Sinai and Palestine but have no known grave are commemorated on the Jerusalem Memorial. Over 3,300 names of the missing from these campaigns are inscribed on the Memorial’s panels.
Why was the Battle of Beersheba important?
The Battle of Beersheba was the trigger that caused a wave of British victories throughout Syria-Palestine.
By December 1917, General Allenby and British Imperial troops had captured Jerusalem. Allenby was the first Christian to capture the holy city since the Medieval era. Conscious of the multi-faith makeup of his forces, Allenby was vocal in downplaying any associations with Crusaders.
The Ottoman Empire was on its knees by the end of World War One. The Armistice of Mudros was inked on 30th October 1918 ending hostilities in the Middle East. Istanbul, the Empire’s ancient capital, was occupied by combined Italian, French, British and Greek Forces.
An empire which had lasted for five centuries was gone.
Beersheba was the pivot that turned the tide of momentum of the war in the Middle East. Other actions, like the Arab Revolt, contributed to the victory too, and alongside Beersheba drastically changed the region’s military landscape.
It also proves that the Great War went beyond the Western Front. All too often, we forget that this was a world war.
We also tend to think that World War One was entirely static with men hunkered down in trenches and inching forward incrementally. In the Middle East, this wasn’t the case. Warfare here was based on manoeuvre and the movement capabilities of the cavalry units involved greatly contributed to the victory at Beersheba.
The battle is also one of Australia’s key national moments. The cavalry charges of the 4th and 12th Australian Light Horse proved decisive in winning the town.
Australian historian Jonathon King considers the battle to be “Australia’s first big achievement on the world stage”. He even proposes that Beersheba should replace Gallipoli as his nation’s foundational myth.
Discover the stories of the Commonwealth’s war dead
The stories of the men who fell at Beersheba are out there waiting for you to find them. You can do that with our Find War Dead tool.
You can search by name, regiment, rank and many more metrics to help refine your search.
Want to know where they’re buried or want to visit one of our sites? Use our Find War Memorials and Cemeteries search tool to find a site to suit you.