09 January 2024
“I won’t miss the flies, or the lice, or the rats, or good blokes getting killed” – The end of the Gallipoli Campaign
On 9th January, the last Allied troops left the shores of the Dardanelles, concluding one of the First World War’s most infamous episodes: The Gallipoli Campaign.
The Gallipoli Campaign
What was the Gallipoli Campaign?

Landing at Gallipoli, 1915 - Charles Dixon (New Zealand History)
The Gallipoli Campaign, also known as the Dardanelles Campaign, was a British-led operation against the Ottoman Empire.
It took place between April 1915 and January 1916 and has entered folklore as one of the war’s most notorious operations.
Gallipoli’s main aim was to relieve pressure on the beleaguered Russian Empire, which was fighting against the Ottoman, German, and Austro-Hungarian Empires on the Eastern Front.
The Allies were to push up the Dardanelles Strait, a thin body of water that runs into the Sea of Marmara, conquer the Gallipoli Peninsula, and then capture Constantinople (present-day Istanbul).
If successful, the Gallipoli Campaign had the potential to knock the Ottoman Empire out of the war entirely.
The Dardanelles held massive strategic importance and were heavily defended with minefields, Ottoman forts and gun emplacements. The Gallipoli Peninsula likewise held many Ottoman defensive positions.
The campaign was initially planned as a naval expedition. It was thought the ships of the French and Royal Navies and their big guns would be enough to break the Ottoman defences and take the Dardanelles.
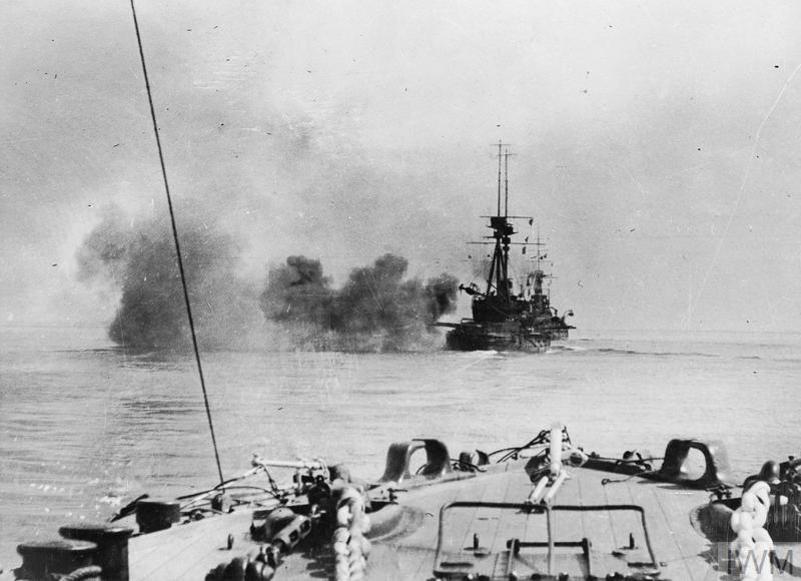
Image: A French battleship's big guns open fire in the Dardanelles (© IWM Q 53526)
Between February and March 1915, Allied battleships peppered the Dardanelles defences with a series of naval bombardments. Ottoman resistance proved fierce. Mines and shelling caused damage to or sunk several Allied ships, including HMS Irresistible and HMS Inflexible.
It had become clear to Allied leadership that sea power alone would not be enough to force the Dardanelles. Boots on the Gallipoli ground would be needed to capture the peninsula and open the way for the navy’s battleships.
Plans were hastily drafted for an amphibious invasion. General Sir Ian Hamilton was tasked with assembling an invasion force to launch an amphibious landing on the Gallipoli Peninsula.
Very few, if any, men in the Allied armies had experience of seaborne invasions. The force was also lacking specialist landing craft.
Hamilton also had a disparate body of troops at his disposable for the Gallipoli landings, including:
- The British 29th Division
- The Royal Naval Division
- 29th Indian Brigade
- Australian & New Zealand Army Corps (ANZACs)
- French Oriental Expeditionary Corps
As the campaign went on, more forces were sent to Gallipoli from around the British Empire, including the Newfoundland Regiment.
Landings & stalemate
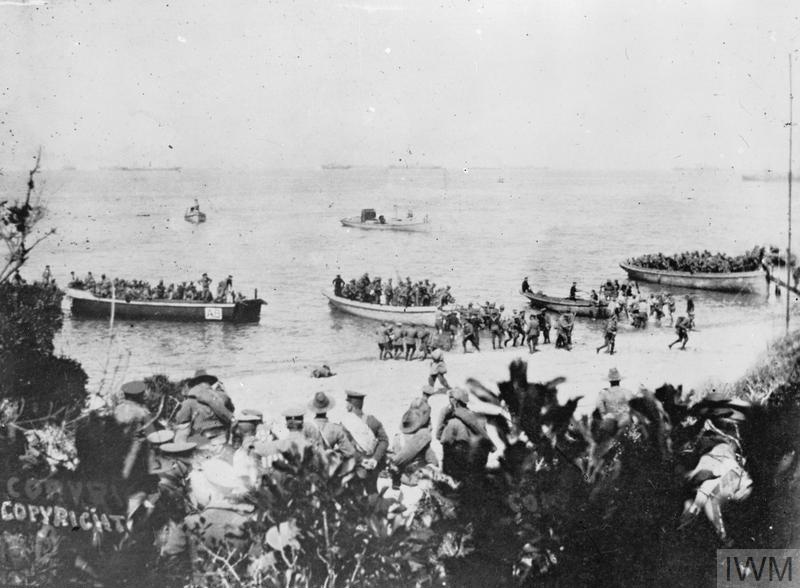
Image: Australians landing at ANZAC Cove, April 25 1915 (© IWM Q 112876)
On the morning of 25 April 1915, the Allies landed at Gallipoli.
French forces launched a diversionary raid on the Asian side of the Dardenelles at Kum Kale, allowing the British 29th Division to launch its assault on the peninsula’s tip at Cape Helles.
The 29th Division was tasked with capturing Krithia, a small village some 2 miles inland from Cape Helles. After that, they would move on to take nearby high ground at Achi Baba, then finally push on to capture forts overlooking the Dardanelles Strait to the Northwest.
Simultaneously, the ANZACs headed into action at Gaba Tepe to the north of Cape Helles. In time, Gaba Tepe would earn the nickname ANZAC Cove thanks to the heavy presence of Australian and New Zealand troops.
The ANZACs objective was to advance to the Sari Bair heights, then move across the peninsula to cut off its southern half and prevent Ottoman reinforcements from reaching their comrades.
Fighting was fierce but the Ottoman defenders under Mustafa Kamel Ataturk led an incredibly spirited defence. Allied troops were cut down on the beaches. Progress at both ANZAC Cove and Cape Helles stalled.
British Private Richard Yorston recalled his experiences at Cape Helles in the Imperial War Museum’s Voices of The First World War Project:
“As we topped the rise we came under pretty heavy fire. One of my platoon was killed beside me; a couple of yards further on Captain Aneer from another company was killed. And as we crossed the plateau quite a number of others went down – you could see them falling in the just getting full light.
“The advance went straight on across the plateau down into the valley on the other side, where we reformed under Major Brockman. He then led us along a valley for about a mile and a half until we were about halfway up the slopes of Battleship Hill. We were driven back all day and we never regained that territory afterwards.”
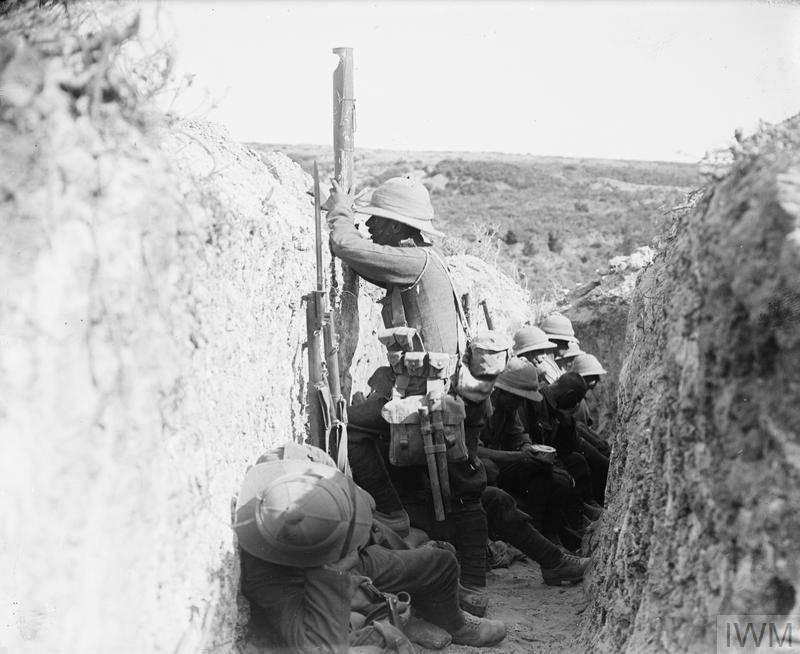
Image: A sentry scans the horizon uses a periscope to survey the scene from his trench in Gallipoli (© IWM Q 13323)
As had happened on the Western Front, trench warfare set in, bringing a stalemate that would last until the final evacuation in January 1916.
As the months rolled by, conditions worsened. Trenches were hastily dug in beaches and the Dardanelles' thin, rocky soil. Soon sickness was running rampant throughout the Allied troops. Even eating was difficult as black clouds of buzzing flies swarmed hungry Allied and Ottoman soldiers.
Private Harold Boughton recalled the scenes:
“One of the biggest curses was the flies. There was millions and millions and millions of flies. The whole of the side of the trench used to be one black swarming mass.
“Anything you opened, if you opened a tin of bully or went to eat a biscuit, next minute it would be swarming with flies. They were all around your mouth and on any cuts or sores that you’d got, which all turned septic through it. It was a curse, really, it really was.”
From April 1915 onwards, the Allied troops continued to try and break the stranglehold with several offensives. Three attempts to capture Krithia were mounted in this time, all of which were unsuccessful, at a cost of 25% casualties on both sides.
Casualties continued to mount as conditions continued to worsen for the troops stuck on Gallipoli’s beaches and headlands.
The August Offensive
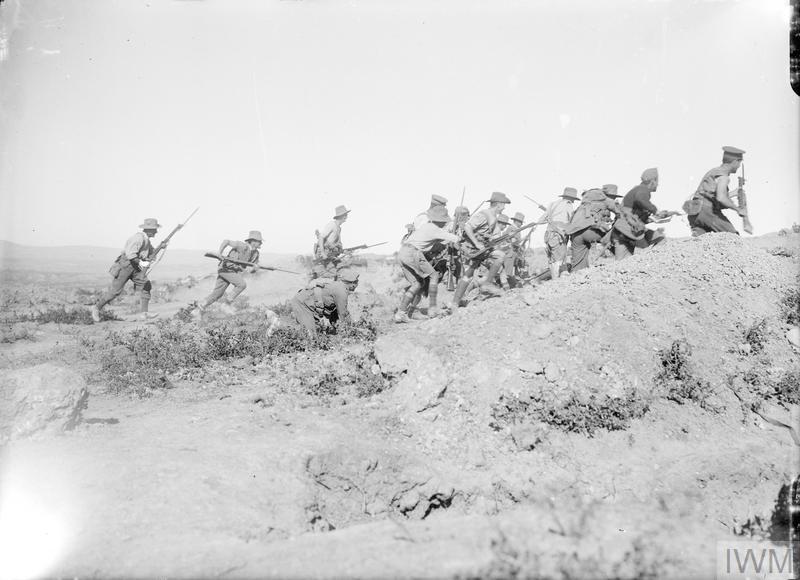
Image: Australian infantry on the charge (© IWM Q 13685)
Hamilton received an influx of new reinforcements from across the British Empire in August 1915 in preparation for a major offensive designed to break the deadlock once and for all.
A series of assaults and attacks were launched throughout the month, including:
- Battle of Sair Bair
- Battle of Krithia Vineyard
- Battle of Lone Pine
- Battle of Chunuk Bair
- Battle of the Nek
- Battle of Scimitar Hill
Hamilton launched the August Offensive on the 6th, starting with a diversionary attack at Cape Helles. Elsewhere, the ANZACs continued to drive up from ANZAC Cove into the high ground at Sari Bair and a new amphibious assault was launched at Suvla Bay.
Suvla Bay initially started well, taking the Ottoman defenders by surprise, but the men, under the command of Lieutenant-General Sir Frederick Stopford, moved too slowly inland. That gave the Ottomans the chance to move into favourable high positions, raining carnage down on the attacking Allied infantry.
Some other successes were scored, such as the capture of ground at Lone Pine but by the 10th, the offensive had stalled. The Ottomans continued to put up a ferocious defence. Artillery shells, machine-gun fire, and snipers’ bullets took a heavy toll on the Allied forces.
Hill 60
The last forward assault the Allies attempted during the Gallipoli Campaign was the 21st August attack on Hill 60 spearheaded by the New Zealand division. The Kiwis were supported in their attack by British, Indian, and Australian troops.
Initially, the attack went well but the Indian Brigade and Australians supporting the New Zealanders were able to keep up, thanks to Ottoman defence. Gurkhas were able to relieve some of the Kiwis, but Ottoman artillery and machine-gun fire forced the Commonwealth troops to withdraw.
A further attempt to take Hill 60 was made six days later on the 27th of August. Bitter fighting resulted in yet more Commonwealth casualties, but the high ground remained in Ottoman hands.
Evacuating the Gallipoli Peninsula
At home, public opinion was beginning to swing against the Dardanelles offensive. The British Government was alarmed at the campaign’s high cost in lives for seemingly zero gains.
What’s more, in October 1915, Bulgaria entered the war on the side of the Central Powers (Imperial Germany, The Austro-Hungarian Empire, and the Ottoman Empire), opening yet another front requiring yet more manpower and materiel.
Winter was starting to set in too, bringing an entirely new set of hardships for the men in their makeshift trenches. Frostbite and hypothermia were as much a danger for the Commonwealth soldiers as enemy fire.
Severe storms were starting to brew up out at sea too, putting strain on supply missions.
On November 13th, a small boat arrived at North Beach near ANZAC Cove. From it stepped British Secretary of State for War and British Army legend Field Marshal Lord Herbert Kitchener.
Kitchener had come to survey the ANZAC positions for himself. After surveying the situation at Lone Pine and Sphinx, Kitchener spent two days conferring with senior commanders. Upon his return to London, Kitchener recommended evacuating Gallipoli.
After much discussion and resistance from Hamilton who felt a withdrawal would damage British prestige, the order to evacuate was given on December 8th, 1915.

Image: Cape Helles before evacuation (Wikimedia Commons)
The trouble was how to evacuate with minimal casualties and without alerting the Ottomans. Military planners were anticipating a potential bloodbath. The result was very different.
Australian Lieutenant-Colonel Charles Brudenell White, the Commonwealth forces employed some clever deceptions to fool the Ottomans into thinking they were just making standard winter preparations.
No artillery or sniper fire was directed from the ANZAC lines, or if it was, it would come from rifles set up to fire intermittently and automatically.
Starting in December, the ANZACs began withdrawing in a three-phase evacuation. First, men and their equipment would move out in a style consistent with winter campaigning preparations.
Phase two would see the soldiers on ANZAC lowered to the point where they would be able to hold off a Turkish attack for one week.
Between the first two phases, the ANZAC presence in Gallipoli was reduced from 41,000 servicemen to 26,000. Finally, between 18-20 December, the final ANZAC soldiers left the Dardanelles.
The British garrison at Cape Helles was maintained for several weeks before the order was given to withdraw on December 28th. Unlike at ANZAC Cove, the Ottomans were looking for signs of withdrawal.
An Ottoman attack was launched on British positions on January 7th but was repelled at great cost to the assaulting forces.
On the night of the 7th-8th of January, under cover of a naval barrage and with mines laid ahead of their positions, the British began their withdrawal. The last British troops departed at 8.00 am on the 8th.
The final Commonwealth troops to leave Gallipoli were the Newfoundland Regiment who departed on 9th January.
Despite fears casualties would be excessive, the Allies were able to withdraw from the peninsula in good order. Over 35,000 troops, 3,700 horses and mules, 125, 330 vehicles, and 1,600 tons of equipment were evacuated.
The only real casualties were 500 or so pack mules that were killed to stop them from being captured by the Ottomans.
Aftermath of Gallipoli: What went wrong?
From the initial landings in April 1915, the Allies struggled to achieve a decisive breakthrough at Gallipoli.
The campaign had been a costly failure in both manpower and equipment.
So, what went wrong? Some of the reasons historians give regarding Gallipoli's failure include the below points.
- It was a poorly conceived and rushed campaign – Historians generally agree that Gallipoli’s aims were unclear and ultimately unrealistic. The land campaign was hastily put together and overly complicated too, and intelligence was lacking regarding the Ottoman's strength.
- The Army was unprepared for an amphibious operation – The British and Commonwealth troops assigned to fight in Gallipoli were not sufficiently equipped or trained to operate on this scale. Britain was enduring a munitions crisis which was affecting the Western Front. The guns and ammunition needed to fight in Gallipoli simply weren’t available. The Allies also had no specialist landing craft, something essential to a successful amphibious assault.
- It was a logistical nightmare – Armies are dependent on tight, controlled supply lines. Britain lies 2,000 miles away from the Dardanelles. The next largest base of operations was in Alexandria, which is 700 miles away. Lemnos, Greece, was 60 miles from Cape Helles but lacked proper harbour facilities. Combined with flimsily-built piers on the landing beaches, the U-boat menace, and Ottoman fire, supplying and maintaining Allied positions in Gallipoli was exceptionally difficult on top of the wider munitions challenges faced by the British Army at the time.
- Ottoman Opposition – The Ottoman forces were well drilled, well dug in, experienced, and well-led. In addition to Turkish commanders like Enver Pasha and Mustafa Kamel Ataturk, the Ottomans were coordinated by German General Otto Liman von Sanders: a very competent, measured General. The combination of experienced, motivated defenders and their leadership made the Ottoman defenders a formidable fighting force.
British prestige was heavily damaged by the Gallipoli Campaign. Winston Churchill, then First Lord of the Admiralty and one of the major driving forces behind the Dardanelles adventure, saw his reputation greatly diminished by the experience.
Gallipoli, the ANZACs & national identity
For New Zealand and Australia, Gallipoli was a baptism of fire from which both nations emerged with a new sense of national identity.
Each nation began to shed their formerly British identities and embraced notions of individuality which would eventually blossom into full independence. The servicemen who gave their lives in the cauldron of Gallipoli helped cement independent futures for Australia and New Zealand.
Subsequently, ANZAC Day was established on 25 April 1916 to remember the loss of life endured by Australia and New Zealand in the Dardanelles and how the campaign shaped both nations' character and identity.
Casualties: Counting the cost of Gallipoli
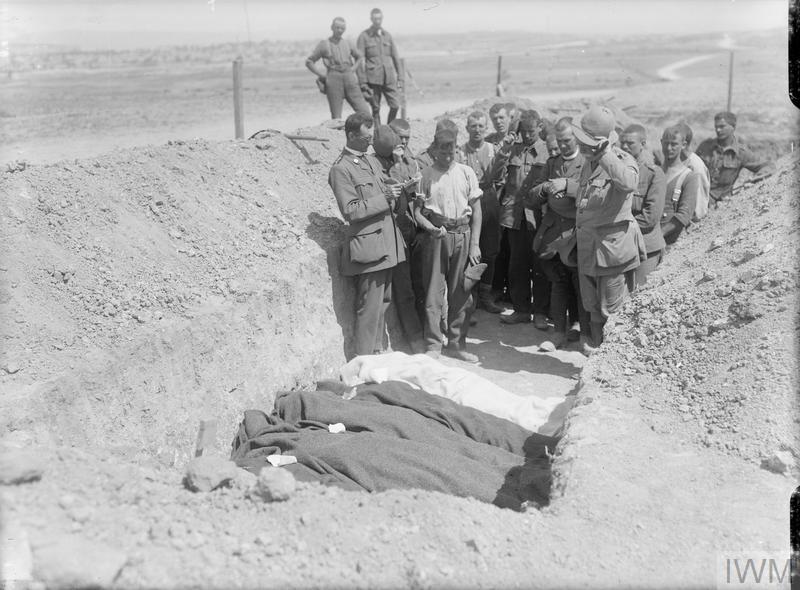
Image: A chaplain leads a funeral service for four British soldiers (© IWM Q 13390)
Gallipoli was costly. A total of 489,000 Allied troops fought in the Dardanelles Campaign. Around 141,500 of them became casualties. 44,150 were killed.
The below shows the deaths per Commonwealth nation in the Dardanelles:
- United Kingdom – 21,255 killed (73,485 total casualties)
- Australia – 8,709 killed (28,150 total casualties)
- New Zealand – 2,779 killed (7,991 total casualties)
- India – 1,358 killed (4,779 total casualties)
- Newfoundland – 49 killed (93 total casualties)
The French forces in Gallipoli suffered a total of 27,000 casualties, including 10,000 killed.
Likewise, the Ottoman Empire also endured significant casualty numbers. 86,900 Ottoman soldiers lost their lives in the campaign, with overall casualties totalling 251,300.
Captain Alfred John Shout VC
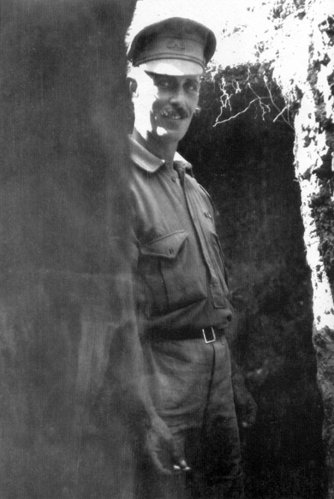 Prior to the First World War, Wellington-born Captain Alfred John Shout had served with the Border Horse and Cape Artillery in the Second Boer War in the early 1900s.
Coming back from South Africa, Alfred settled in Sydney, Australia, settling down with his wife and daughter, working as a carpenter. Alfred also enrolled in the local militia too.
Come the outbreak of the First World War, Alfred enlisted in the Australian Imperial Force, becoming a founding officer of the 1st Battalion.
Lieutenant Shout sailed with his men to Egypt for training and before long the 1st Battalion was on its way to Gallipoli.
While there, Alfred showed incredible bravery and a total lack of regard for his safety in performing his duties. He won multiple accolades during his time in the Dardanelles, including a mention in despatches and a Military Medal.
For his actions during the 27th of April 1915 attack on Walker’s Ridge, he earned his men’s admiration for continually going forward despite being wounded multiple times. He had to be carried off the field by his soldiers, despite his protests.
On July 25, Alfred was promoted to Captain.
August 6 saw the ANZACs engaging Ottoman troops at Lone Pine. Alfred was in the main assault force where he performed the actions that won him the Victoria Cross.
Alfred’s VC citation reads:
“On the morning of 9th August, 1915, with a small party, Captain Shout charged down trenches strongly occupied by the enemy, and personally threw four bombs among them, killing eight and routing the remainder.
“In the afternoon he captured a further length of trench and continued personally to bomb the enemy at close range, under very heavy fire, until he was severely wounded, losing his right hand and left eye. He succumbed to his injuries.”
Alfred was buried at sea and is commemorated on the Lone Pine Memorial in Gallipoli.
Trooper James Gorrie
 James Gorrie, a Coppersmith’s apprentice from Perth, Scotland, was one of many cavalrymen deployed to the Dardanelles.
Before his military service, James led a globe-trotting life, travelling around the world to gain experience.
His journeys took James to Montreal, Detroit, Calgary, Vancouver, Sydney, and Melbourne before he found employment with locomotive engineers Messrs Thomson & Co., in Castlemaine, Vitoria, Australia.
James was working at Thomson & Co. when Australia entered the First World War in August 1914. He immediately enlisted, joining the 4th Light Horse, the regiment in which he would serve in Gallipoli.
Cavalry and horsemen seemed ill-suited to the terrain and conditions of the Gallipoli peninsula, so they were deployed as infantry instead. The 4th Light Horse Regiment came ashore at ANZAC cover between the 22nd-24th May, and its squadrons were subsequently scattered amongst the Australian infantry units to bolster numbers.
James and his unit spent most of their time in the Dardanelles defending the precarious ANZAC positions, usually around a point known as Ryrie’s Post. James was likely killed performing these defensive duties.
He was 28 years old and is buried at Beach Cemetery, ANZAC in Gallipoli.
Discover more stories from those who fought and fell at Gallipoli with For Evermore.
Commemoration
There are over thirty sites commemorating the Commonwealth’s fallen on the Gallipoli Peninsula.
These men lay on or close to the battlefields where they lost their lives, with the famous quote from Mustafa Kemal Ataturk cementing Turkey’s gracious commitment to allowing the war dead to lie in these sites.
Some of the most significant points of commemoration that Commonwealth War Graves maintains in the Dardanelles include:
Helles Memorial

The Helles Memorial is the largest of Commonwealth War Graves’ Gallipoli memorials by number of servicemen commemorated.
20,960 officers and enlisted men from Australia, India, and the United Kingdom are commemorated by name on the proud edifice. The memorial includes Army casualties, but also naval personnel lost in ships sunk during the Dardanelles Campaign.
As well as commemorating these men specifically, the Helles Memorial serves the dual function of acting as the central focal point for commemoration on the Gallipoli peninsula.
There are four other Memorials to the Missing at Gallipoli:
- Lone Pine Memorial
- Hill 60 Memorial
- Chunuk Bair (New Zealand) Memorial
- Twelve Tree Copse Memorial
Lone Pine Cemetery
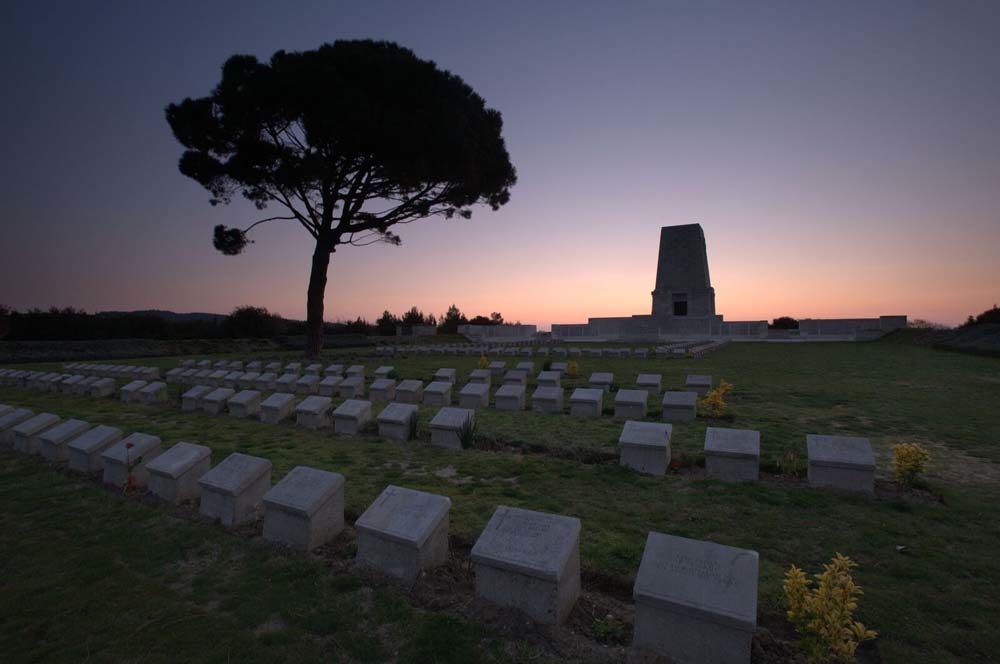
Lone Pine in the southern part of the ANZAC zone of attack was a strategically important plateau. Australian forces had briefly captured it during the April landings, but it was retaken and held by Ottoman forces between May-July. By then, Lone Pine was known as Bloody Ridge (“Kanli Sirt” in Turkish).
Mines were pushed towards Gallipoli by the Australians in late May up to August. On 6th August, mine explosions ripped through the land while naval big guns pounded Lone Pine.
The 1st Australian Brigade took Lone Pine in a storm of Steel and Gunfire. Four days of Ottoman counterattacks failed to dislodge the Aussies. Lone Pine would remain in ANZAC hands until the eventual Allied withdrawal from the Dardanelles in December 1915.
Some 1,167 Commonwealth burials lie within Lone Pine Cemetery. 504 of these casualties are unidentified, and their names will be on one of the many memorials to the missing scattered around Gallipoli.
Lone Pine Memorial sits within the cemetery’s grounds Its location marks the site of the fiercest fighting for control of the Peninsula. The tall, proud limestone memorial overlooks the former frontline area, on which 4,900 Australian and New Zealand servicemen are commemorated.
Hill 60 Cemetery
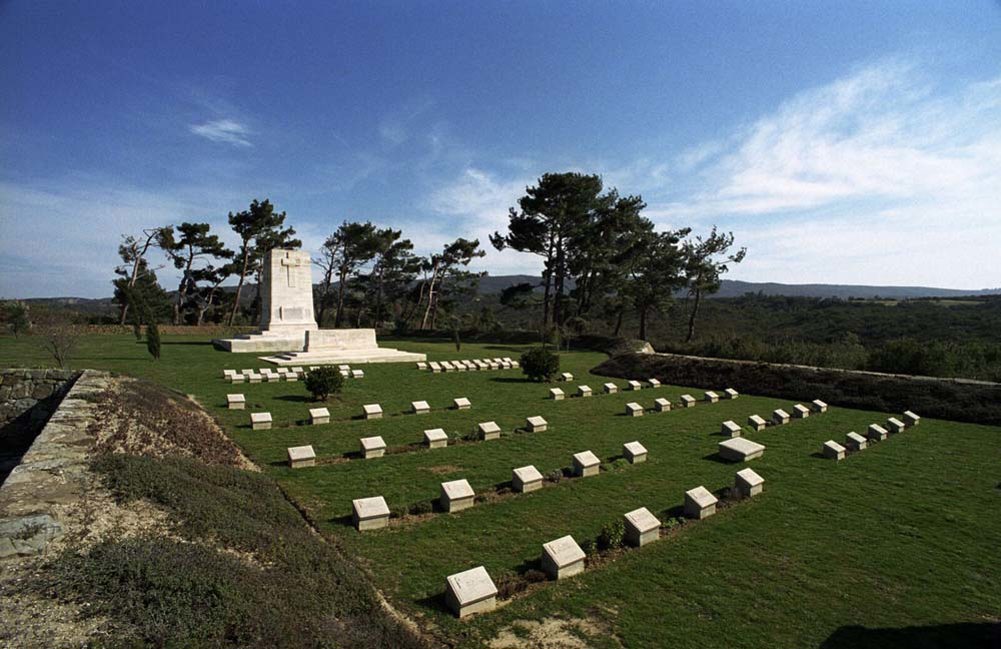
Hill 60 Cemetery lies among the trenches of the actions of Hill 60. It was made after those engagements and enlarged after the Armistice by the concentration of graves from Norfolk Trench Cemetery and from the battlefield.
There are now 788 Commonwealth servicemen of the First World War buried or commemorated in this cemetery. 712 of the burials are unidentified, but special memorials commemorate 34 casualties known or believed to be buried among them.
At the beginning of August 1915, Hill 60, which commanded the shoreward communications between the forces at Anzac and Suvla, was in Turkish hands.
On 22 August, it was attacked from Anzac by the Canterbury and Otago Mounted Rifles, followed later by the 18th Australian Infantry Battalion and supported on the flanks by other troops.
It was partly captured and on 27-29 August, and the captured ground was extended by the 13th, 14th, 15th, 17th and 18th Australian Infantry Battalions, the New Zealand Mounted Rifles, the 5th Connaught Rangers, and the 9th and 10th Australian Light Horse.
Within the cemetery lies the Hill 60 Memorial: one of four memorials erected to commemorate New Zealand soldiers who died on the Gallipoli peninsula and whose graves are not known, commemorating 180 fallen servicemen.