17 January 2023
The Battle of Tripoli: How Montgomery & 8th Army pushed the Afrika Corps out of Libya
What started at El Alamein continued in Libya. 80 years on, we examine one of the World War Two African Campaign’s key engagements: the Battle of Tripoli.
The Battle of Tripoli 80 years on

A British armoured car fires into the distance during the Battle of Tripoli 1943 (Wikimedia Commons)
Prelude to Tripoli: 8th Army in Egypt
British and Commonwealth Troops had been engaged in deadly battles across north and eastern Africa for nearly three years by 1943.
The campaign had started well. British, Indian, South African, Australian, and New Zealand units had proved their mettle after dishing out defeats on the Italian Army in 1940.
While the Italians had offered little resistance, they were soon reinforced by German panzers and soldiers. This was the Afrika Korps and under its commander, Erwin Rommel, they proved much stiffer opposition than their Italian counterparts.
From Rommel’s arrival, the British and Commonwealth armies in North Africa were continually outfought and outmanoeuvred. Rommel’s ability to slip away and inflict defeat upon defeat on his opponents earned him the nickname the Desert Fox.
After the disastrous loss of the port of Tobruk in Libya in June 1942, and their forces pegged back to Egypt, British High Command had to act.
A complete reorganisation of its ground forces occurred in July 1942. First, General Claude Auchinleck was appointed Commander-in-Chief Middle East. He was able to stop Rommel’s advance in his tracks at the first Battle of El Alamein.
Was the tide turning?
Enter General Bernard Montgomery
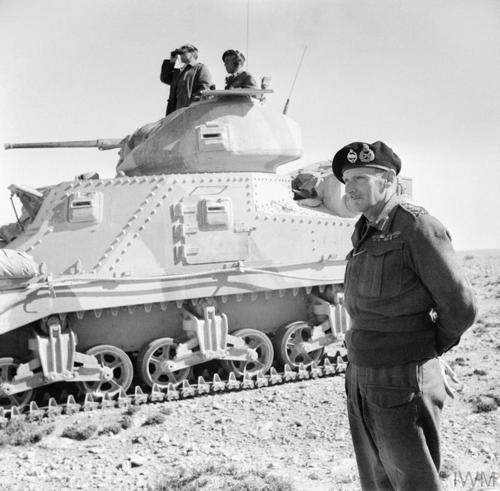 Image: General Montgomery beside a Grant tank near Tripoli, 27 January 1943 (© IWM E 21701)
By August, Auchinleck had been replaced by a man who would become famous for defeating the wily Desert Fox once and for all: General Bernard Montgomery.
Montgomery led a wholesale reorganisation of the forces under his command. Through intense training and a big focus on raising his men’s morale, he whipped the multinational 8th Army into a well-oiled military machine.
By October 1942, Montgomery and 8th Army were preparing to fight one of World War Two’s decisive battles: the Second Battle of El Alamein.
The war on the Eastern Front had been grinding up German resources while British control of the Mediterranean was starving the Afrika Korps of men and materiel. Weakened, 8th Army smashed into the Wehrmacht on the night of October 23rd.
Over the next two weeks, the Afrika Korps was battered by Monty and the men of 8th Army. By the battle’s end, the German army had been pushed out of Egypt altogether.
Next up for 8th Army: Libya.
The Desert Fox retreats
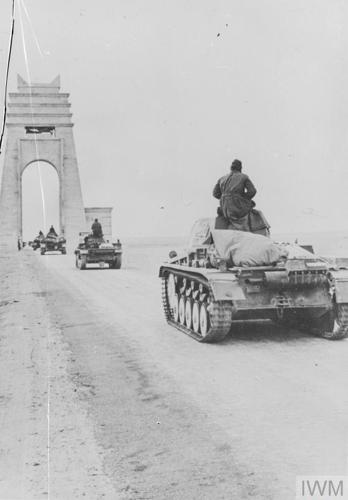 Image: German armoured vehicles pull back past the Italian Monument known to British troops as "Marble Arch" (© IWM STT 467)
Rommel had taken ill ahead of Second El Alamein and sent back to Germany for rest and recuperation. By the time he was back on the frontline, 8th Army was pushing Rommel’s forces back.
What followed for Rommel and the men of the Afrika Korps was a staggering 1,400 miles retreat across Libya and into Tunisia. Montgomery and 8th Army followed him all the way.
During its retreat, the Afrika Korps lost 130 tanks and 1,000 artillery guns. In the desert, long-range weaponry was essential to victory. Rommel couldn’t afford to lose such important equipment, especially with his supply lines in dire straits.
Heavy rains limited the ability of the Royal Air Force Desert Air Force to fully harass the retreating Germans.
But with retreat, the Axis left behind airfields. Each airfield captured added to the RAF’s ability to support ground forces, drop in supplies, and attack the retreating Germans and Italians.
While Rommel was retreating, the Allies had landed men in Morocco, Tunisia, and Algeria under Operation Torch. This marked the entry of the United States in the Mediterranean and North Africa and the first time they fought alongside their Commonwealth and French counterparts.
Endgame in the desert was approaching.
The Battle of Tripoli begins

Sherman tanks charge up the coastal road towards Tripoli (© IWM E 21797)
The successes kept coming for 8th.
Axis forces had already lost over 75,000 men after being “knocked groggy” at El Alamein. Now it was a case of picking a spot to dig in.
On December 12th, Rommel had chosen El Agheli on Libya’s Mediterranean Coast, several hundred miles from the Egyptian border, to make a stand.
8th Army, which had quietly been building up its strength, hit into the Axis position on 12th December 1942. A terrific bombardment, coupled with RAF bombing and infantry and tank attacks, swept the Afrika Korps aside.
Under duress from the pursuing Commonwealth forces, the Afrika Korps pulled back.
Between December 16th-17th, 8th Army appeared from the desert to cut Axis forces in two, close to a site called Wadi Matratin near a mock Egyptian memorial erected by the Italians. British troops came to call the monument “Marble Arch” in reference to the famous triumphal monument in London.
15th January 1943. Rommel again makes a stand, this time 230 miles west of El Agheli at the village of Buerat. Tripoli, that vital port, was another 200 or so miles away.
Once more, Montgomery’s men fell upon their Axis opponents with overwhelming force. Rommel was forced to withdraw from Buerat on the night of the 15th.
Montgomery closes in on Tripoli
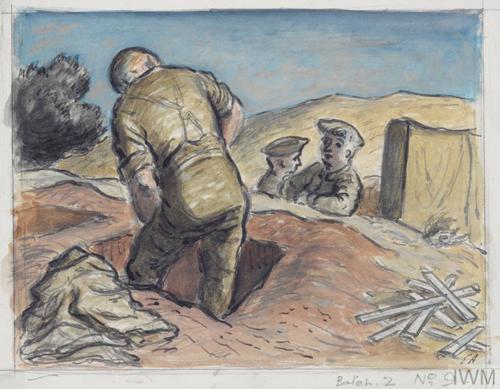 Image: "On the Road to Tripoli - Near Home. The grave-digger beside the road" - Edward Jeffrey Irving Ardizzone, 1943. A reminder that, although the (© IWM Art.IWM ART LD 2938)
At the beginning of his army’s push into Libya, Montgomery told British war correspondents that Tripoli would be in British hands by the 22nd of January.
He was as good as his word.
Failure to secure the port could be falling back but the momentum was with 8th Army. Its men had been capturing the blasted and battered Libyan towns and villages that once held Italian and German soldiers.
By the 19th of January, the attack on Tripoli was gaining steam.
Several key coastal towns were captured in quick succession:
- Homs on 20th January
- El Aziez on 21st January
- Castelverde on 22nd January
Rommel’s rear guard put up a strong show of resistance, but they were ultimately broken by the unrelenting 8th Army advance.
8th Army Enters Tripoli
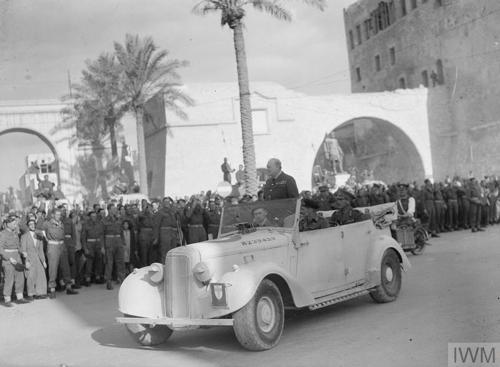 Image: Prime Minister Winston Churchill stands up to receive an ovation from the troops in the main square at Tripoli. (© IWM E 22294)
At dawn on January 23rd, 1943, General Bernard Montgomery stood on Diebel Heights outside of Tripoli, overlooking the city.
Arrayed before him were teeming columns of men and machinery, marching down Tripoli’s roads, thoroughfares, and boulevards.
From the south came the New Zealanders leading a column of British armour; from the east came the 51st Highlanders, arriving along the coastal road, the Mediterranean twinkling on their flank. Another column pushed into the city from the west.
It was a total victory. Since October, Rommel and the Afrika Korps had been battered by an organised, motivated, multi-national army: 8th Army.
The Desert Air Force also played an enormous role in securing victory in Libya. Its pilots and planes were a constant thorn in the side of the Axis. By the time of Tripoli’s capture, the Allies had achieved air supremacy, controlling the skies.
The bruised Axis troops continued their flight into Tunisia, abandoning Tripoli and Libya.
On 3rd February, British Prime Minister Winston Churchill addressed the victorious troops:
“Let me then assure you, soldiers and airmen, that your fellow countrymen regard your joint work with admiration and gratitude, and that after the war when a man is asked what he did, it will be quite sufficient for him to say, ‘I marched and fought the Desert Army.’”
The war in North Africa would continue to rage until May 1943. However, the avalanche caused by Monty’s victory at El Alamein, and the capture of Tripoli, would go someway towards ending the war in this theatre.
Commonwealth War Graves Commission sites in Tripoli
Tripoli War Cemetery


The main site we maintain in Tripoli is Tripoli War Cemetery.
After the city’s capture, Tripoli became an important port for the remainder of the North African campaign. It also became a central hospital hub where wounded from battlefields in Libya and neighbouring Tunisia were cared for.
Burials in Tripoli War Cemetery are nearly all predominantly taken from the city’s main hospitals, including Nos 2, 48, and 133 general hospitals.
Just over 1,350 Commonwealth burials are found in Tripoli War Cemetery. 133 of them are unidentified World War Two casualties.
Amongst the casualties are notable medal winners, including:
- 7 Military Cross recipients
- 5 Distinguished Flying Cross recipients
- 5 Military Medal Recipients
Captain Peter Thornton Norris MC
 Image: Captain Peter Thorn Norris MC (laurinlaurin espie, Find a Grave)
Canterbury, New Zealand native Captain Peter Thornton Norris was 28 years old when he fell in the fighting around Tripoli.
Kiwi regiments had served with distinction across the length of the war in the desert. They had been involved in the opening battles against the Italians down to the final shots fired in anger in North Africa.
Unfortunately, Captain Norris would not survive the war. According to our records, Peter fell on 17th December 1942, during the great push across Libya, rooting out the Desert Fox’s forces from their defensive positions.
He is buried in Tripoli War Cemetery.
Captain Norris had previously been awarded the Military Cross for his exploits in a previous battle at Ruweisat Ridge in the run-up to the first Battle of El Alamein in the summer of 1942.
Peter’s award citation reads:
“This officer was commanding a company when his battalion attacked the enemy at Ruweisat Ridge on the night of July 15th-16th 1942.
He led his company forward under heavy MG [sic}, mortar and shell fire.
Despite the stiff resistance encountered, he pushed forward with his company and reached the objective.
At first light, enemy tanks counterattacked taking some prisoners including the battalion commander.
Captain Norris immediately took command of the situation and, by moving the infantry onto a high feature, prevented their capture by the tanks.
He then consolidated the position with all available men and held it during the day.
He displayed the greatest gallantry during the attack and, by his cool bearing and steadiness, set a splendid example to his men. “
Major Ronald Anderson Gerrard DSO
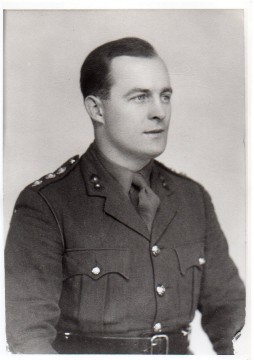 Image: Major Ronald Anderson Gerrard (Tim Reynolds, Find a Grave)
In addition to his Distinguished Service Order, Major Ronald Anderson had the honour of earning 14 caps for the England rugby team.
Since his school days, Ronald had established himself as an exemplary sportsman. He excelled at shot put, swimming, water polo, football, cricket, and rifle shooting, but it was rugby that was Ronald’s true calling.
Ronald was introduced to the sport aged 17 when apprenticed to a firm of civil engineers in Bath, southern England.
From then on, Ronald would be a fixture for the Blue, Black and White. He earned appearances at country level for Somerset and for England where he played in some of the early 20th century’s most iconic games, a 13-0 victory for England.
Ronald’s form saw him captain Bath between 1934-1936 and again between 1937-1938. He also gained an invitation to play for the famous Barbarians touring rugby side.
Away from rugby, Ronald had served in the Territorial Army, achieving the rank of captain. Upon the deceleration of war in 1939, Ronald was called up. He served as a Major in the Royal Engineers.
One of the challenges posed by armies in the desert was minefields. Fields of these deadly explosives could stretch for miles, restricting movement and reinforcing enemy positions.
Clearing minefields was no easy task. Apart from the dangerous nature of the mines themselves, they often had to be cleared under fire while attacks were raging all around the sappers charged with the job in hand.
Major Gerrard was one such sapper. During the advance in the North Africa campaign, Ronald lead men by example, getting stuck in with the dangerous job of mine clearance.
His actions in such hazardous conditions saw Ronald awarded the Distinguished Service Order in October 1942.
Ronald’s citation reads:
“Major Gerrard showed the greatest courage and determination in his leadership which was an inspiration to all who saw it. The successful piercing of the enemy fields in his sector was largely due to his personal efforts and example.”
Tragically, Ronald was killed on 22nd January 1943, just one day before the liberation of Tripoli. He is buried in Tripoli War Cemetery. His headstone’s personal inscription reads:
“Gerry played fought and died for England.”
Discover more World War Two stories with the Commonwealth War Graves Commission
Our search tools can help you discover the cemeteries and memorials commemorating World War Two casualties from North Africa and around the world.
Use our Find Cemeteries & Memorial search function to find all our sites. You can search by country, locality, and conflict.
Want more detail? Use our Find War Dead tool to search for specific ANZAC casualties by name or by country to learn more.